
In this comprehensive guide, we will detail the process of creating, customising, and applying patterns of Hatch unique using the functionality SuperHatch at LusoCAD 2024.
Introduction to Customised Hatch Patterns
Before we move on to the creation process, it's essential to understand that customised hatch patterns consist of two main elements: the base pattern and its application. This tutorial will cover both aspects in detail.
Creating the Base Pattern
Initial configuration
Start by opening a new drawing in LusoCAD 2024. Let's start by creating a simple square that will serve as a base.
-
First, draw a square with the following specifications:
- Width: 100 units
- Height: 100 units
-
Make sure that all measures are rigorous to guarantee consistent results.
Modifying the Pattern
Now let's modify our base square to create a unique pattern:
- Rotate the square 45 degrees using its centre point as a reference.
- Add arcs to create details in the pattern:
- Use the option "start and radius".
- The radius of each arc must be set to 100 units.
- Connect the opposite corners using the arches.
- Repeat the process for all the corners of the square.
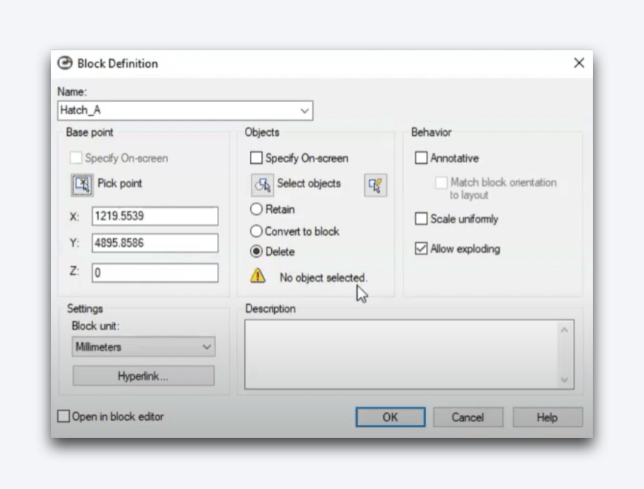
Converting the Pattern into a Block
Block Creation Process
Converting the created pattern into a block is essential for reuse. Follow these steps:
- Access the command Create Block in the insert menu.
- Assign a identifiable name to the block.
- Select the midpoint of the square as the base point.
- Choose all the elements of the pattern.
- Activate the option "Delete Original Objects" to clear the initial drawing.
Preparing the Target Area
Creating the Application Rectangle
Before applying your pattern, you'll need to create the target area:
- Draw a new rectangle.
- Define the dimensions of the rectangle:
- Width: 1000 units
- Height: 1000 units
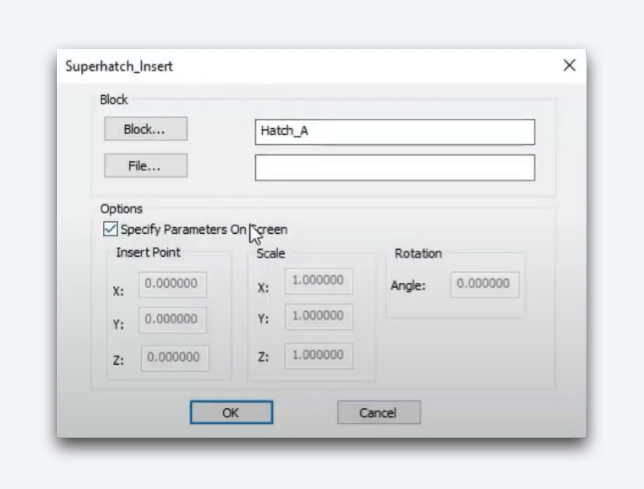
Applying the Customised Pattern
Using SuperHatch
Functionality SuperHatch allows you to apply the pattern precisely:
- In the menu Express, select SuperHatch.
- Choose the option "Block".
- The block you created earlier should automatically appear in the list.
Pattern Application Settings
Set the following main parameters:
- Insertion PointSelect a point within the rectangle created.
- Scale Factor:
- Scale X: 1
- Y scale: 1
- Rotation: 0 degrees
Final Application Steps
Complete the process of applying the standard:
- Set the limits selecting the opposite corners of the rectangle and press Enter.
- Choose the area of application by clicking inside the rectangle.
The pattern will be generated automatically.